DVD to MP4 Converter for Mac Tutorial
The following tutorial will explain how to convert a DVD to MP4 video or audio on your Mac by DVD to MP4 Converter for Mac. Download and install DVD to MP4 Converter for Mac, and then follow the step-by-step guides to convert DVD.
Before you start, run Xilisoft DVD to MP4 Converter for Mac at first.
Step 1: Add DVD
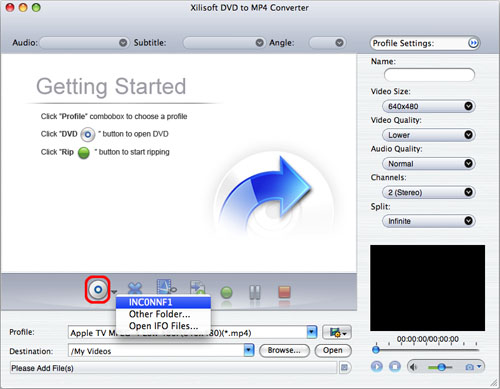
Insert a DVD, click "Open DVD" button, and select the inserted DVD in the dialog box that opens to load it. The loaded DVD information, such as chapter and title etc. will be showed in the file list.
Or, click "Open DVD" drop down button, select "Other Folder" option, select a DVD folder in the file dialog box that opens, and load it.
Click "Open DVD" drop down button, select "Open IFO Files" option, select an IFO file in the file dialog box that opens, and load it.
Step 2: Select output format
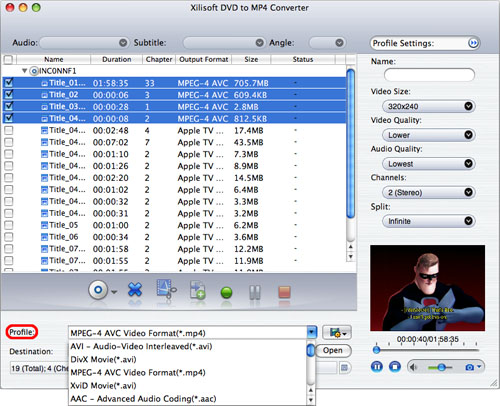
Select one or more files in the list, click "Profile" drop-down button, select an output format for selected files in the drop down list that opens.
Tip: To adjust output settings, you can set the detailed parameters of output format in the right profile settings panel.
Step 3: Set output folder
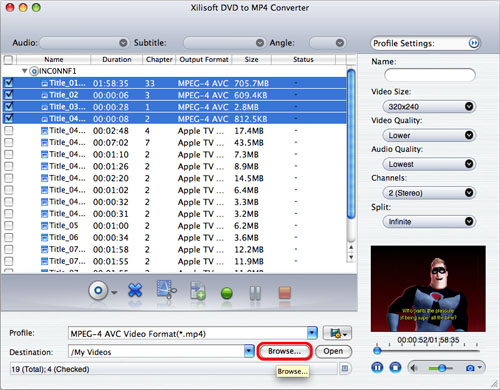
Click "Browse" button on the right of "Destination", select a destination folder in the dialog box that opens, and click "Open".
Tip: If you want to do more with your video and audio files, please refer to the "More usage skills".
Step 4: Extract file
After finishing the above settings, check the needed file to extract in the file list, click "Start Ripping" button on the main interface, to start extracting the file. You can view the progress of the extracting process from the progress bar at the bottom of the window.
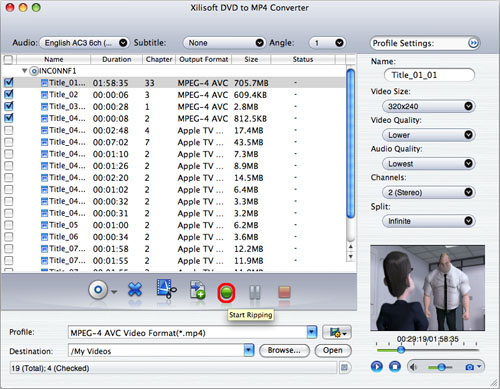
Tip: You can click "Pause Ripping" button to pause the extracting process or "Stop Ripping" button to cancel the process as required.
More usage skills
1. Clip video segment
The software provides video clipping function, which allows you to choose the segments you like from the source video, and add them to the file list.
To do this:
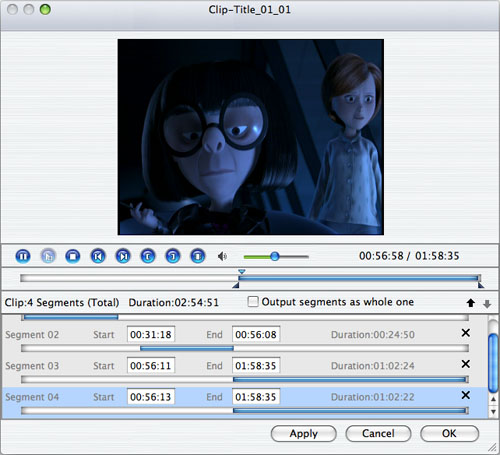
1. Select a video file in the file list, click "Clip" button in the toolbar to open "Clip" window, and start to edit the video.
2. Click "Play" button to play selected video file.
3. Click "Set Start Point" button to set the start point in the playback. When the video jumps to the end point you want, click "Set End Point" button to get a segment. The segment will be added to the segment list.
4. Click "New Clip" button, and repeat Step3 to clip a new segment.
Tip: You can drag the slider to adjust the position of "Start" and "End" point.
5. In the segment list, to delete a segment, please select it and click "Delete" button. To adjust the position of the segment in the list, please select it and click "Move Up" and "Move Down" button.
6. After the above actions, click "OK" button to go back to the main interface and the segments will be added into the file list.
Tips:
1. Segment list displays all segments that are needed to output, including the start time, end time and duration.
2. Check "Output segments as whole one" option to merge the segments in the list into one video to output.
2. Take snapshot
The software supports to take snapshot at will, to store the image you like.
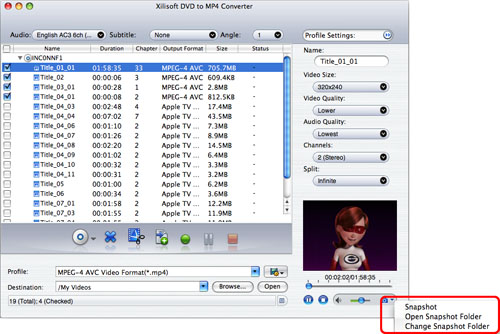
Select a video file in the file list, click "Play" button in the video preview window. When the video jumps to the image you like, click "Snapshot" button, to store the image in the snapshot folder.
Tip: You can set the snapshot folder by yourself. To do this, click "Change snapshot folder" from "Settings" drop down list, select the snapshot folder you want in the dialog box that opens.
3. Set multiple output formats for one file
The software supports to output multiple files with different formats from one video.
To do this:
1. Select a file in the file list.
2. Select an output format in the "Profile".
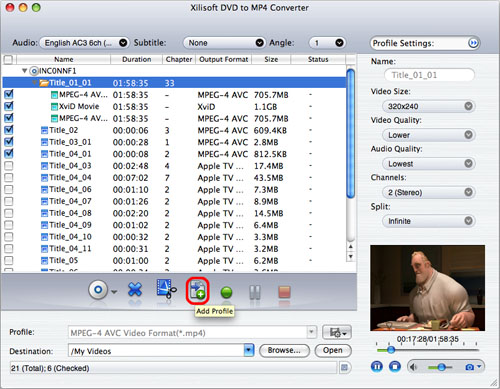
3. Click "Add profile" button, the software will create a profile directory under the selected file automatically.
4. Select the profile item you want to change, click profile dropdown button, and select a new output format from the list.
4. Custom output size
The software supports customizing the size of the output file.
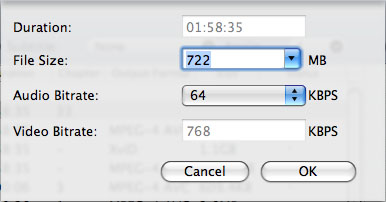
To do this, please click "Tools > Bitrate Calculator" to open "Bitrate Calculator" dialog box, select a file size you want, or enter the file size in the textbox directly, then the corresponding video bitrate will be automatically calculated. Meanwhile, you can also set "Audio Bitrate" in this dialog box.
