Xilisoft FLV to WMV Converter Tutorial
Xilisoft FLV to WMV Converter converts FLV videos downloaded from YouTube to WMV files. This guide will show you how to convert FLV to WMV video file with this software.
First, download, install and launch Xilisoft FLV to WMV Converter.

Step 1: Load FLV files
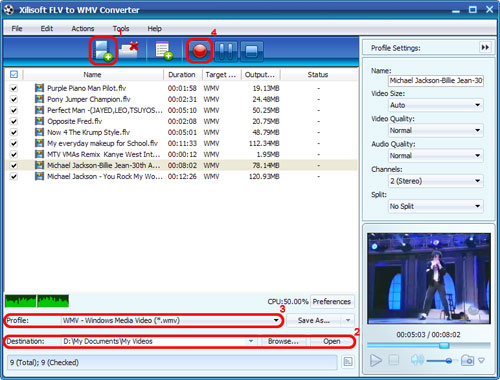
Click "Add File(s)" button on the toolbar or "File > Add File(s)" to load the files you want to convert.
You can also click "File > Add Folder" to select the folder you want to add, then all files in the folder will be loaded into the file list.
Tip: You can double click the loaded file in the file list to view the file information.
Step 2: Choose output folder
Click "Browse" button to choose the destination folder for saving the output files.
Tip: After conversion, you can click "Open" button beside "Browse" button to check the output files directly.
Step 3: Choose output format
Choose the file, click to open "Profile" drop-down list in the "Target Profile" column or at the bottom of the main interface, then choose the format you want.
Tips:
1. Add multiple profiles for the same source file
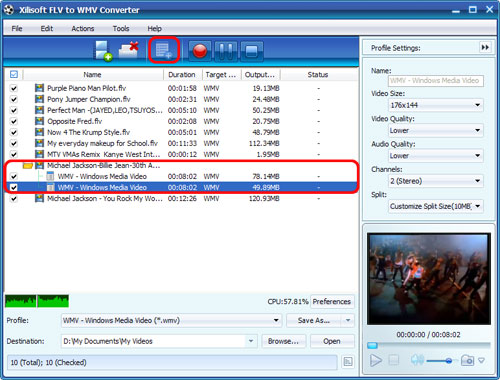
Select the file and click the "Add Profile" button to add a default profile below the file, then select the profile you want from the "Profile" drop-down list. Repeat this step to add as many profiles as you want. In this way, you can get them converted in one click.

2. Customize output file size with Bitrate Calculator
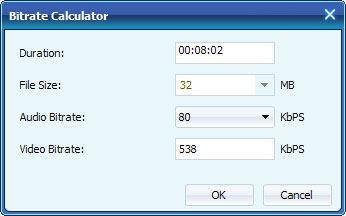
To customize the output file size, select the video file and click "Tools > Bitrate Calculator", and input the file size you want, then the video bit rate will be calculated. Click "OK" button, the size you enter will be displayed in the "Output Size" column.

3. Set the output parameters
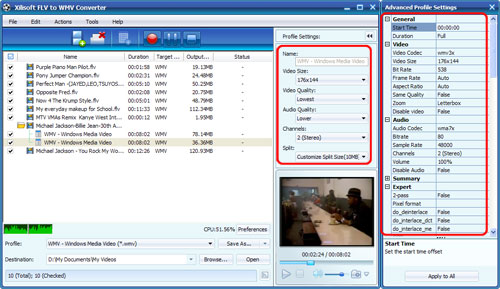
On the "Profile Settings" panel, you can set the following parameters: Name, Video Size, Video Quality, Audio Quality, Channels. Click "Show Advanced Profile Settings" button to expand the advanced profile settings page, in which you can set more parameters for satisfying more needs.

4. Click "Snapshot" button below the preview window on the right-bottom of the main interface to take a snapshot during preview to save as JPG, GIF, PNG, or BMP file.
After the above settings, click "Convert" button on the toolbar to start converting. You can pause, resume or stop the conversion at any time.


